| Polish |
|---|
I. Skład zestawu. II. Montaż urządzenia. III. Dodanie urządzenia do Smart Reef. IV. Konfiguracja pracy urządzenia V. Sterowanie urządzeniem za pomocą przycisku. VI. Sygnalizacja świetlna VII. Czyszczenie urządzenia VIII. Resetowanie urządzenia. IX. Aktualizacja urządzenia. X. Informacje techniczne i ostrzeżenia. XI. Warunki gwarancji. |
| English |
|---|
I. Set composition. II. Assembly of the device. III. Adding the device to the Smart Reef. IV. Configuring the operation of the device V. Controlling the device with a button. VI. Light signaling VII. Cleaning the device VIII. Resetting the device. IX. Updating the device. X. Technical information and warnings. XI. Warranty conditions. |
| German |
|---|
I. Die Zusammensetzung der Menge. II. Zusammenbau der Ausrüstung. III. Hinzufügen des Geräts zum Smart Reef. IV. Konfigurieren des Betriebs des Geräts V. Steuerung des Geräts mit einer Taste. VI. Die Lichtsignalisierung VII. Reinigung des Geräts VIII. Zurücksetzen des Geräts IX. Aktualisieren des Geräts. X. Technische Informationen und Warnhinweise. XI. Garantiebedingungen. |
| Polish |
|---|
I. Set composition.
|
| English |
|---|
I. Set composition.
 |
| German |
|---|
I. Die Zusammensetzung der Menge.
|
| Polish |
|---|
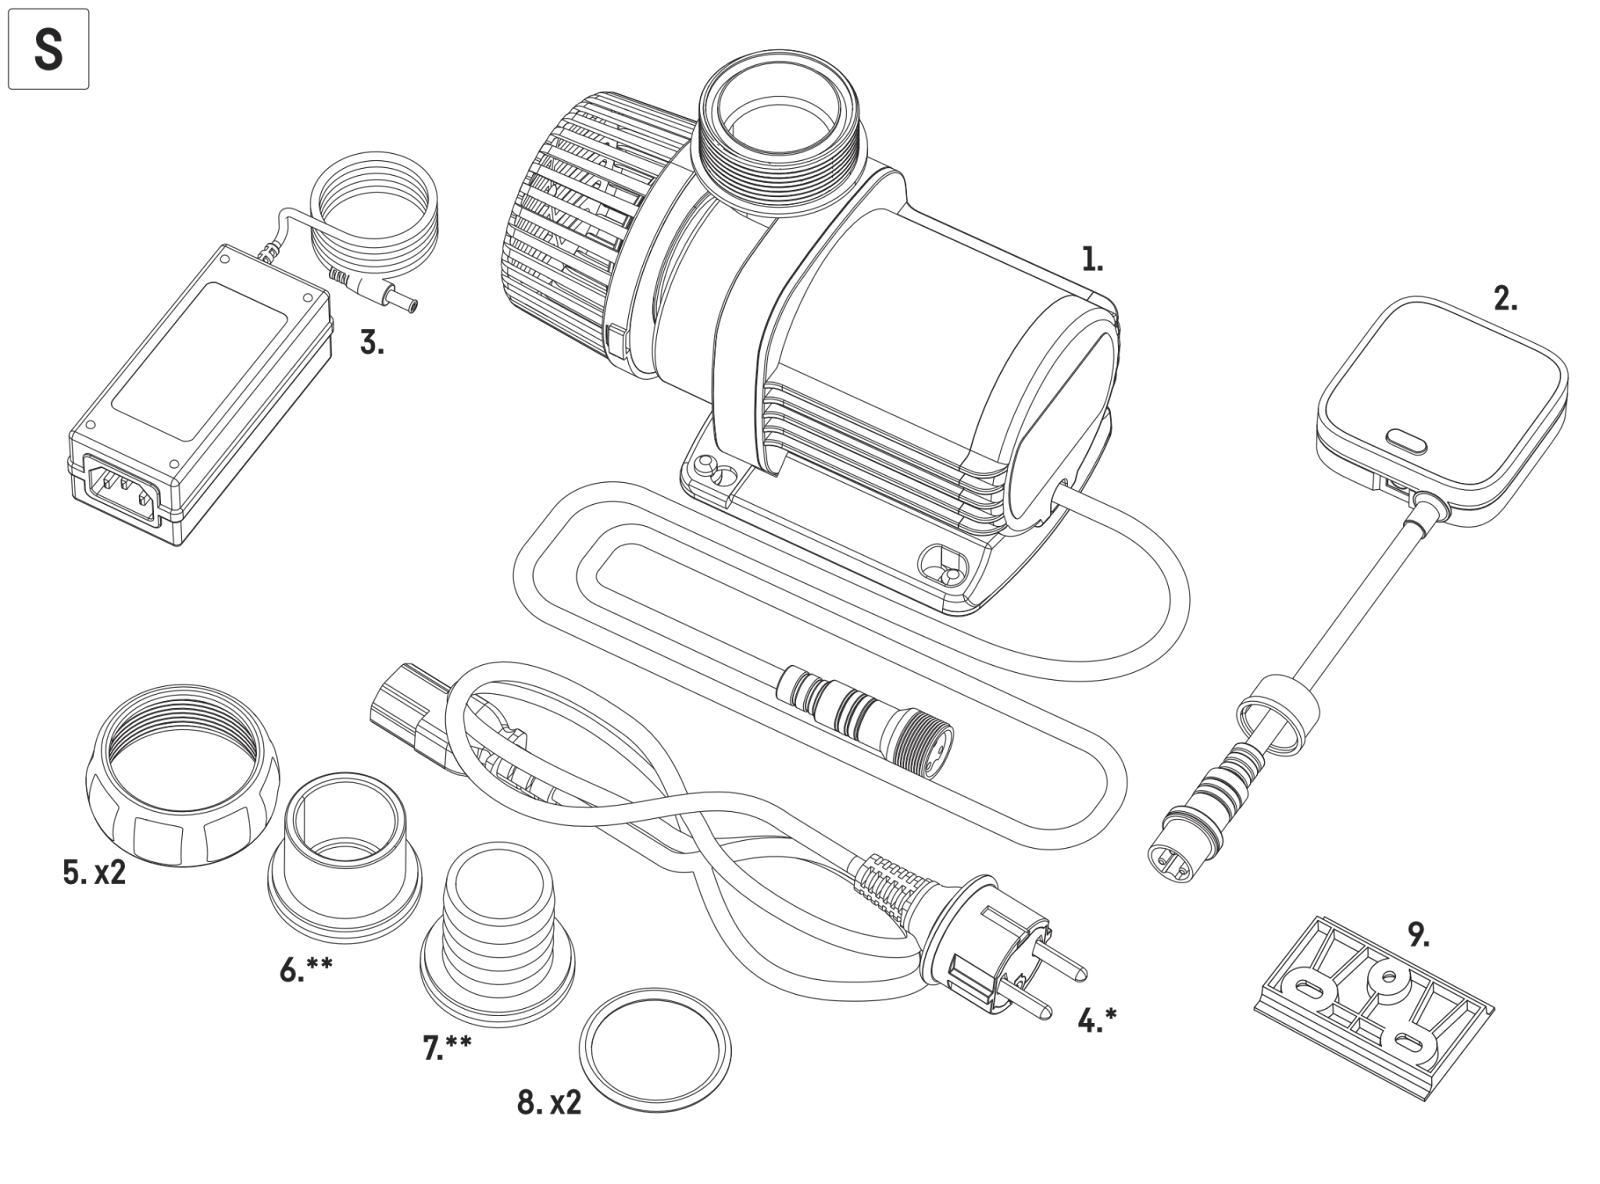
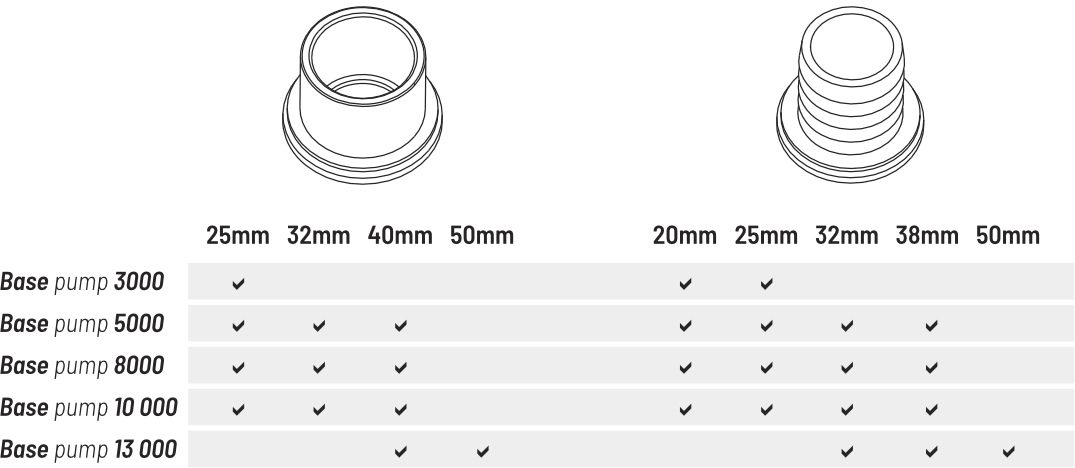
II. Montaż urządzenia. Włóż gumowy O-ring w szczelinę, następnie wybierz odpowiednie przyłączę na wąż lub rurę PVC i dokręć za pomocą nakrętki mocującej 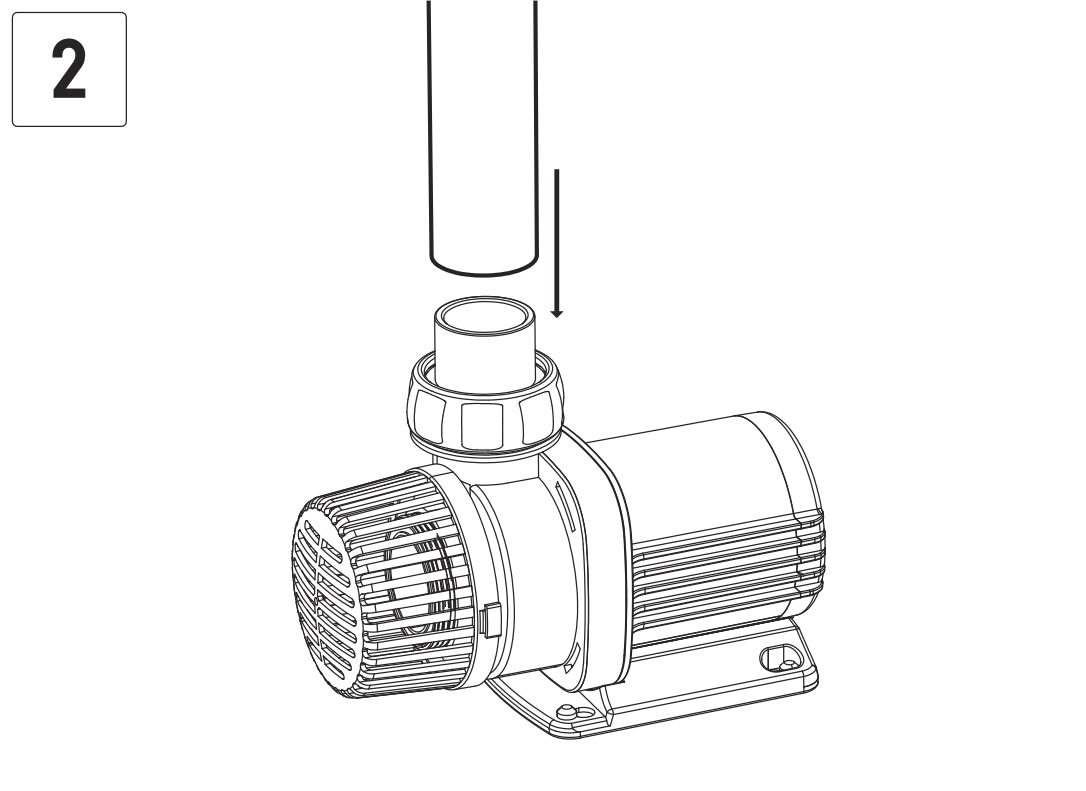 Załóż wąż lub wklej rurę PVC. 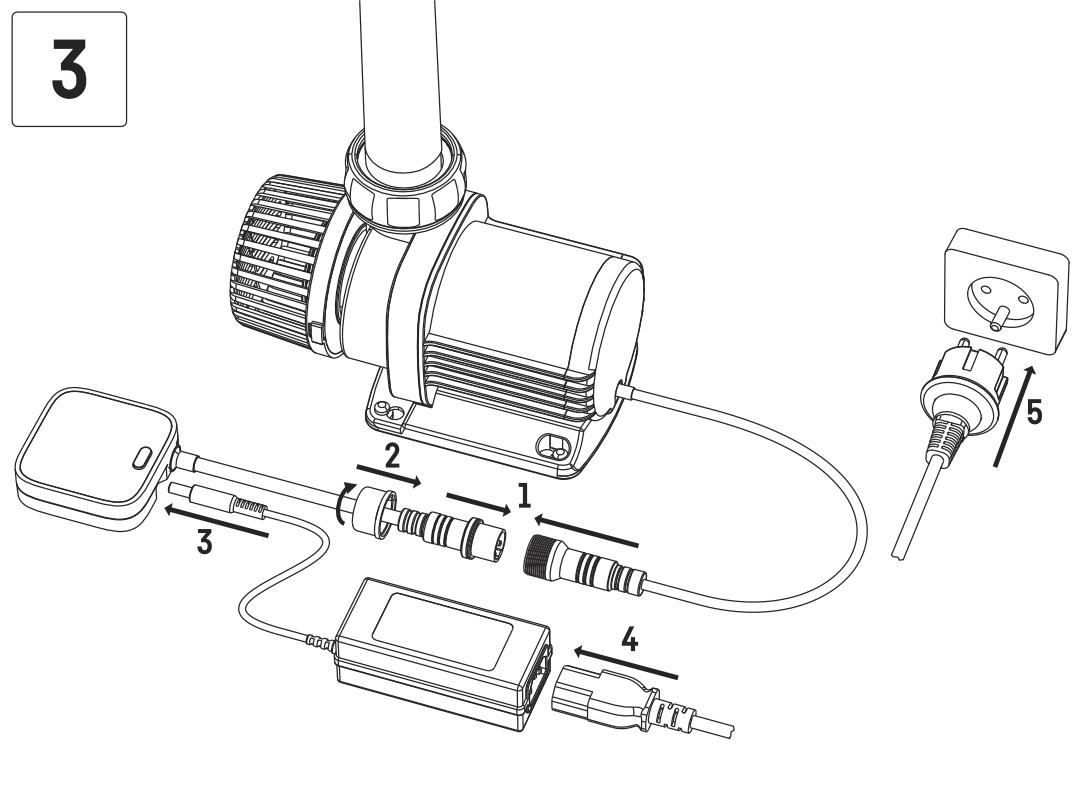 Podłącz pompę do sterownika i skręć połączenie. Następnie podłącz zasilacz do gniazda w sterowniku, a przewód sieciowy do zasilacza. Gdy przewody są już podłączone, a pompa zamontowana na miejscu możesz podłączyć urządzenie do zasilania sieciowego. 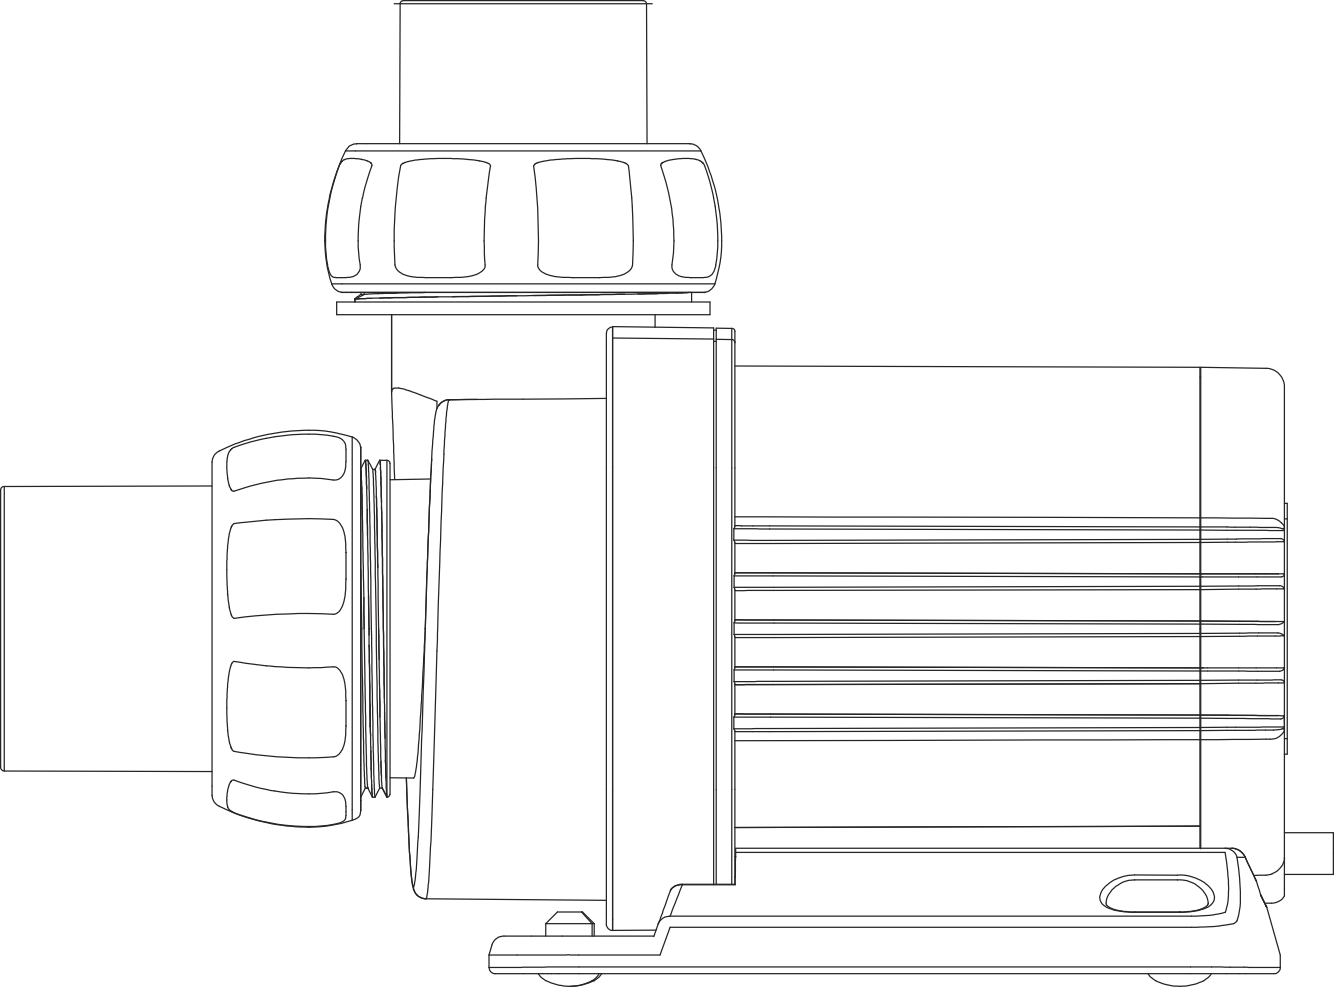 Możesz również zamontować pompę, aby zasysała wode przez rurę. W tym celu odkręć koszyk zabezpieczający, Włóż gumowy O-ring w szczelinę, następnie wybierz odpowiednie przyłączę na wąż lub rurę PVC i dokręć za pomocą nakrętki mocującej. Załóż wąż lub wklej rurę PVC. |
| English |
|---|
II. Assembly of the device.Insert the rubber O-ring into the slot, then select the appropriate connection for the hose or PVC pipe and tighten with the retaining nut. Install a hose or glue PVC pipe. Connect the pump to the controller and twist the connection. Then connect the power supply to the socket on the controller and the power cord to the power supply. Once the wires are connected and the pump is mounted in place, you can connect the unit to the mains power supply. You can also install the pump to suck water through the pipe. To do this, unscrew the safety cage, Insert the rubber O-ring into the slot, then select the appropriate connection for the hose or PVC pipe and tighten with the retaining nut. Install the hose or paste the PVC pipe. |
| German |
|---|
II. Zusammenbau der Ausrüstung.Setzen Sie den O-Ring aus Gummi in den Schlitz ein, wählen Sie dann einen geeigneten Anschluss für den Schlauch oder das PVC-Rohr und ziehen Sie ihn mit der Überwurfmutter fest. Schlauch anbringen oder PVC-Rohr einsetzen. Schließen Sie die Pumpe an das Steuergerät an und verdrehen Sie die Verbindung. Verbinden Sie dann das Netzteil mit der Buchse am Steuergerät und das Netzkabel mit dem Netzteil. Sobald die Kabel angeschlossen sind und die Pumpe an ihrem Platz ist, können Sie das Gerät an das Stromnetz anschließen. Sie können auch eine Pumpe anbringen, um Wasser durch das Rohr zu saugen. Dazu schrauben Sie den Sicherheitskäfig ab, setzen den O-Ring aus Gummi in den Schlitz ein, wählen einen geeigneten Anschluss für den Schlauch oder das PVC-Rohr und ziehen ihn mit der Überwurfmutter fest. Montieren Sie den Schlauch oder das PVC-Rohr. |
| Polish |
|---|
III. Dodanie urządzenia do Smart Reef. |
| English |
|---|
III. Adding the device to the Smart Reef. |
| German |
|---|
III. Hinzufügen des Geräts zum Smart Reef. |
| Include Page | ||||
|---|---|---|---|---|
|
| Polish |
|---|
IV. Konfiguracja pracy urządzenia
|


| English |
|---|
IV. Configuration of device operation
|


| German |
|---|
IV. Konfiguration des Gerätebetriebs
|


| Polish |
|---|
V. Sterowanie urządzeniem za pomocą przycisku.1. Włączanie i wyłączanie urządzenia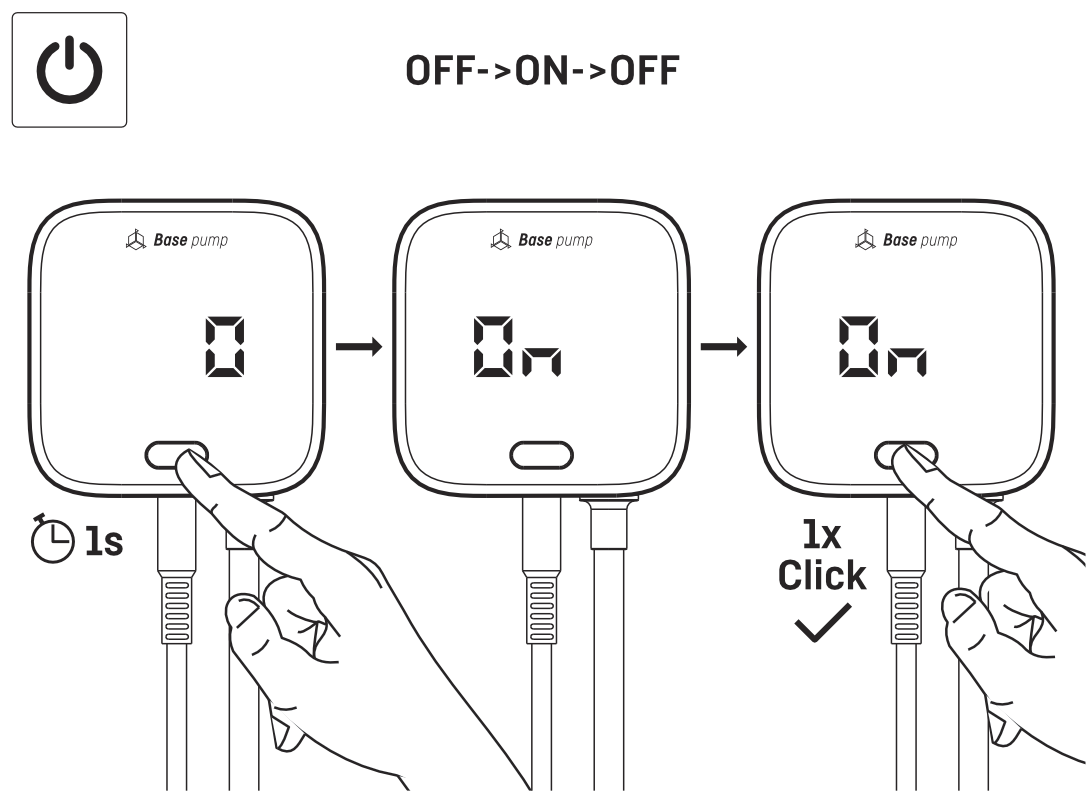 Naciśnij przycisk przez 1 sekundę, aż na ekranie pojawi się „On”. 2. Tryb karmienia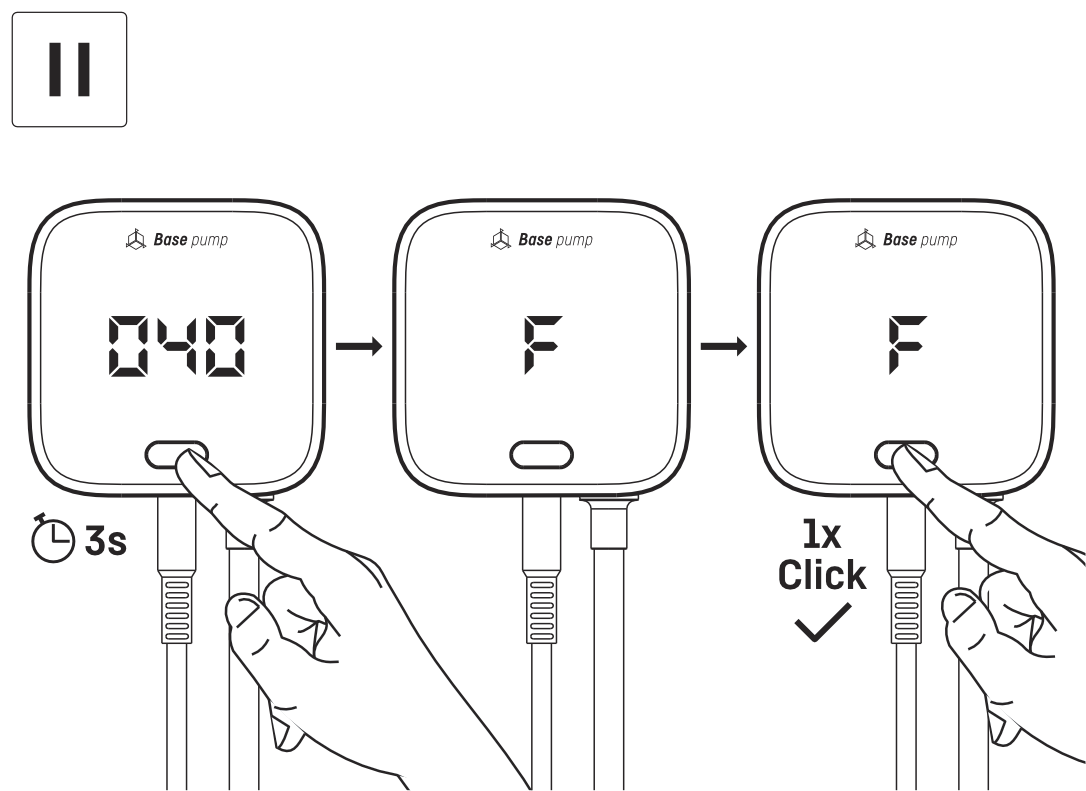 Naciśnij i przytrzymaj przycisk przez 3 sekundy, aż na ekranie pojawi się „F”. Następnie naciśnij przycisk klikając raz, aby potwierdzić wybór. 3. Zmiana parametrów pracy pompy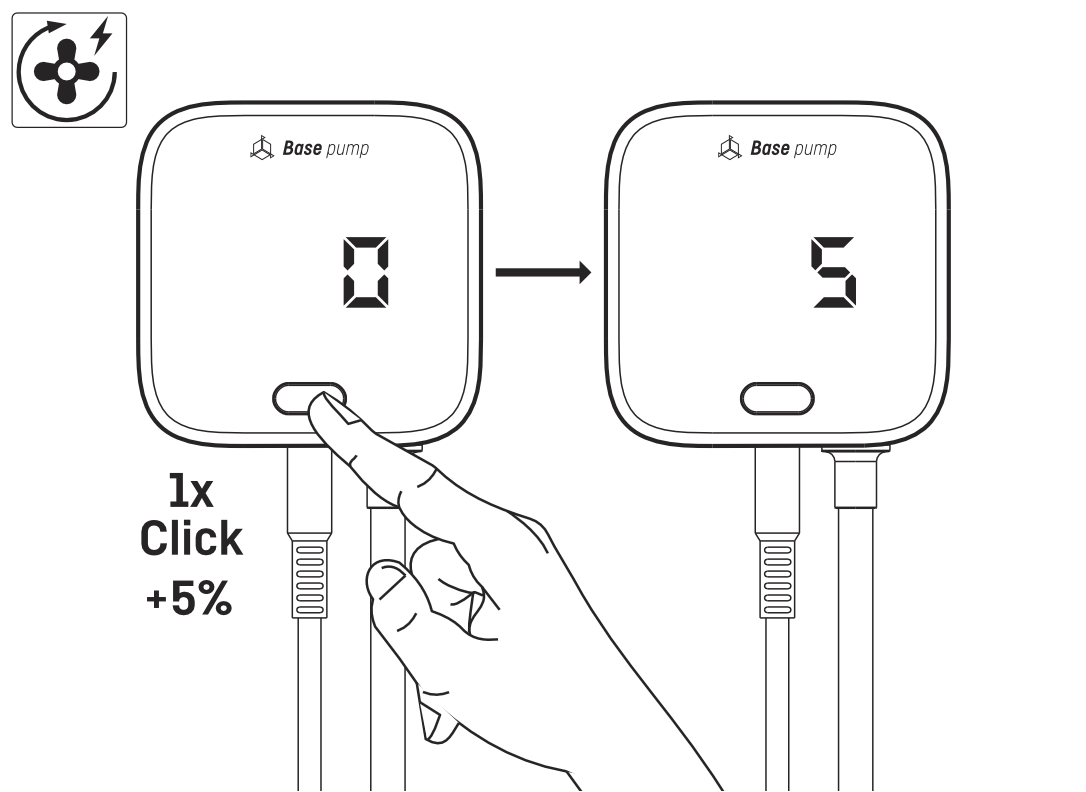 Naciśnij przycisk bez przytrzymywania, aby zwiększyć moc. Każdorazowe kliknięcie zwiększa moc pracy o 5%. Jeśli chcesz zmieniać moc urządzenia z krokiem mniejszym niż 5%, możesz to zrobić w aplikacji lub interfejsie www. 4. Resetowanie sieci WiFi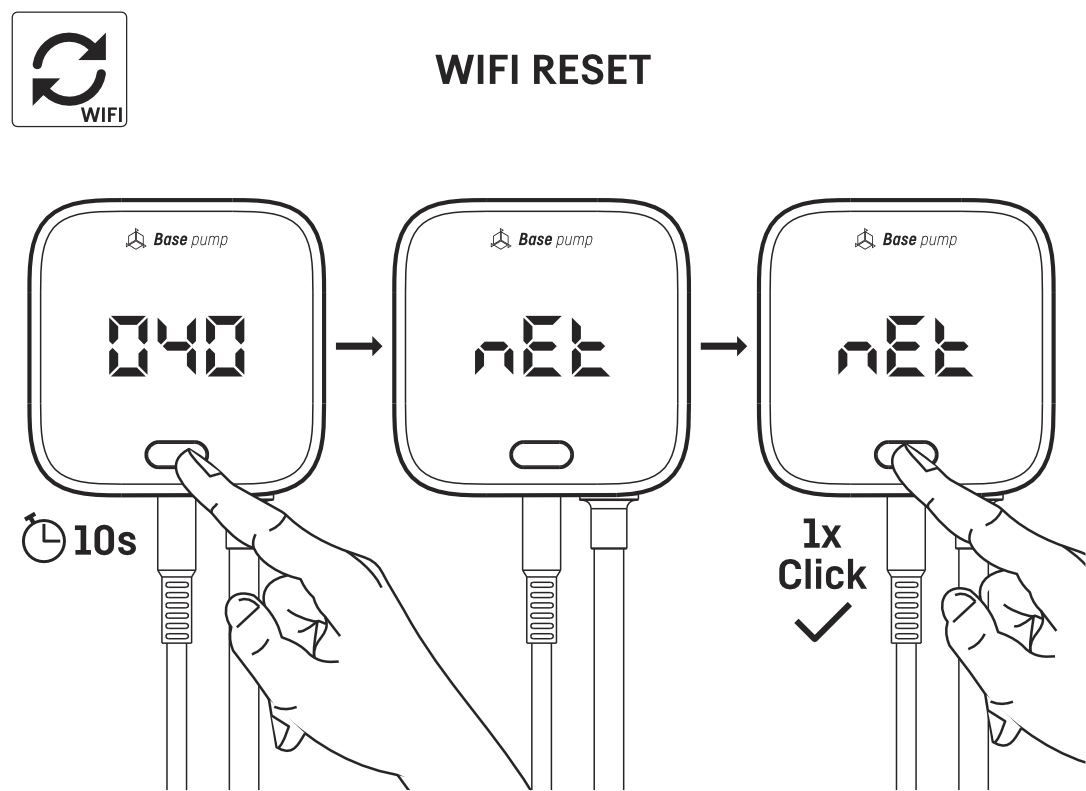 Naciśnij i przytrzymaj przycisk przez 10 sekundy, aż na ekranie pojawi się „net”. Następnie naciśnij przycisk klikając raz, aby potwierdzić wybór. Użyj tej opcji, jeżeli np. zmieniasz hasło do sieci WiFi. Urządzenie zachowa ustawienia. Aby dodać urządzenie do sieci WiFi postępuj zgodnie z opisem w punkcie III. 5. Resetowanie urządzenia do ustawień fabrycznych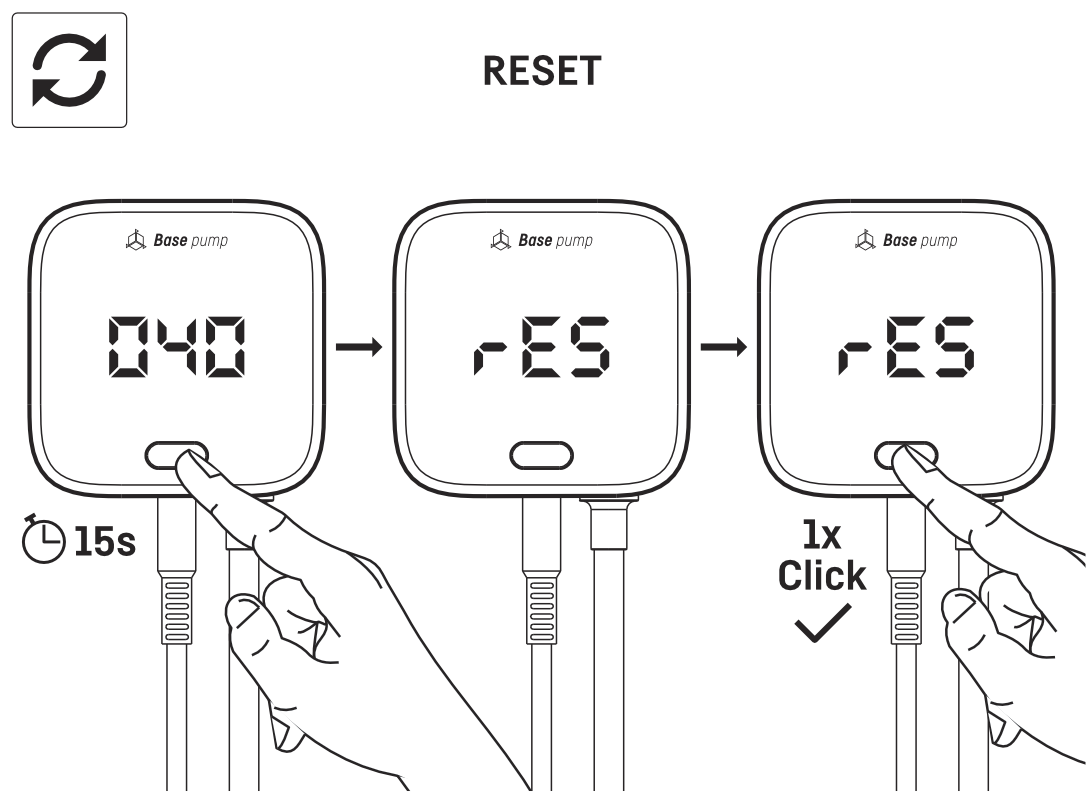 Naciśnij i przytrzymaj przycisk przez 15 sekundy, aż na ekranie pojawi się „res”. Następnie naciśnij przycisk klikając raz, aby potwierdzić wybór. Po zresetowaniu urządzenia do ustawień fabrycznych konieczna jest ponowna konfiguracja, a wszystkie ustawienia zostaną usunięte. |
| English |
|---|
V. Control the device with a button.1 turning the device on and offPress the button for 1 second until "On" appears on the screen. 2 Feeding modePress and hold the button for 3 seconds until "F" appears on the screen. Then press the button by clicking once to confirm the selection. 3 Changing the pump's operating parametersPress the button without holding to increase the power. Each time you click, it increases the power of the operation by 5%. If you want to change the power of the device with a step of less than 5%, you can do so in the app or web interface. 4 Resetting the WiFi networkPress and hold the button for 10 seconds until "net" appears on the screen. Then press the button by clicking once to confirm the selection. Use this option if, for example, you are changing your WiFi network password. The device will keep the settings. To add your device to the WiFi network, follow the steps described in III. 5 resetting the device to factory settingsPress and hold the button for 15 seconds until "res" appears on the screen. Then press the button by clicking once to confirm the selection. After resetting the device to factory settings, a reconfiguration is required and all settings will be deleted. |
| German |
|---|
V. Steuerung des Geräts auf Knopfdruck.1. Einschalten und Ausschalten des GerätsDrücken Sie die Taste 1 Sekunde lang, bis "Ein" auf dem Bildschirm erscheint. 2. FütterungsmodusHalten Sie die Taste 3 Sekunden lang gedrückt, bis "F" auf dem Bildschirm erscheint. Drücken Sie dann die Taste durch einmaliges Klicken, um die Auswahl zu bestätigen. 3. Ändern der Betriebsparameter der PumpeDrücken Sie die Taste, ohne sie gedrückt zu halten, um die Leistung zu erhöhen. Jedes Mal, wenn Sie klicken, erhöht sich die Leistung um 5 %. Wenn Sie die Leistung des Geräts in Schritten von weniger als 5 % ändern möchten, können Sie dies in der App oder im Webinterface tun. 4. Zurücksetzen des WiFi-NetzwerksHalten Sie die Taste 10 Sekunden lang gedrückt, bis "Netz" auf dem Bildschirm erscheint. Drücken Sie dann die Taste, indem Sie einmal klicken, um die Auswahl zu bestätigen. Verwenden Sie diese Option, wenn Sie z. B. das Passwort für Ihr WiFi-Netzwerk ändern. Das Gerät behält die Einstellungen bei. Um Ihr Gerät zum WiFi-Netzwerk hinzuzufügen, folgen Sie der Beschreibung in Abschnitt III. 5. Zurücksetzen des Geräts auf die WerkseinstellungenHalten Sie die Taste 15 Sekunden lang gedrückt, bis "res" auf dem Bildschirm erscheint. Drücken Sie dann die Taste durch einmaliges Klicken, um die Auswahl zu bestätigen. Sobald das Gerät auf die Werkseinstellungen zurückgesetzt wurde, ist eine Neukonfiguration erforderlich und alle Einstellungen werden gelöscht. |
| Polish |
|---|
VI. Sygnalizacja świetlna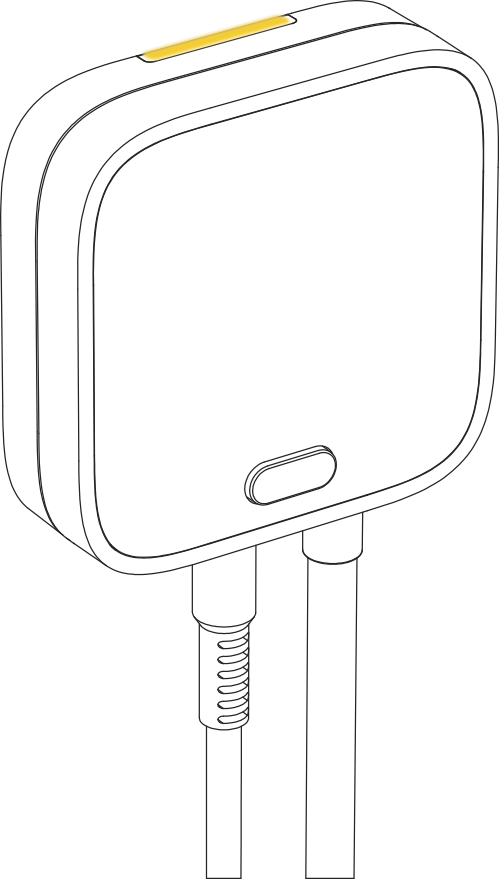 Na górze urządzenia znajduje się dioda sygnalizująca stan urządzenia. Jej trybem włączony / wyłączony można zarządzać w zakładce ustawienia urządzenia. Jej poszczególne kolory oznaczają: Stałe światło pomarańczowe - praca urządzenia |
| English |
|---|
VI. Light signalingOn the top of the device is a status LED. Its on/off mode can be managed in the device settings tab. Its individual colors indicate: Steady orange light - device operation |
| German |
|---|
VI. AmpelnAuf der Oberseite des Geräts befindet sich eine LED, die den Status des Geräts anzeigt. Ihr Ein/Aus-Modus kann auf der Registerkarte "Geräteeinstellungen" verwaltet werden. Die verschiedenen Farben zeigen an: Orangefarbenes Dauerlicht - Gerät in Betrieb |
| Polish |
|---|
VII. Czyszczenie urządzenia |
| English |
|---|
VII. Cleaning of the device |
| German |
|---|
VII. Reinigung des Geräts |
| Include Page | ||||
|---|---|---|---|---|
|
| Polish |
|---|
VIII. Resetowanie urządzenia. |
| English |
|---|
VIII. Resetting the device. |
| German |
|---|
VIII. Zurücksetzen des Geräts. |
| Include Page | ||||
|---|---|---|---|---|
|
| Polish |
|---|
IX. Aktualizacja urządzenia. |
| English |
|---|
IX. Device Update. |
| German |
|---|
IX. Aktualisieren des Geräts. |
| Include Page | ||||
|---|---|---|---|---|
|
| Polish | |||||||||||||||||||||
|---|---|---|---|---|---|---|---|---|---|---|---|---|---|---|---|---|---|---|---|---|---|
X. Fehlercodes
|
| English | |||||||||||||||||||||
|---|---|---|---|---|---|---|---|---|---|---|---|---|---|---|---|---|---|---|---|---|---|
X. Error codes
|
| German | |||||||||||||||||||||
|---|---|---|---|---|---|---|---|---|---|---|---|---|---|---|---|---|---|---|---|---|---|
X. Fehlercodes
|
| Polish | ||||||||||||||||||||||||||||||||||||
|---|---|---|---|---|---|---|---|---|---|---|---|---|---|---|---|---|---|---|---|---|---|---|---|---|---|---|---|---|---|---|---|---|---|---|---|---|
X. Informacje techniczne i ostrzeżenia.
|
Urządzenie produkowane jest z zastosowaniem różnych wersji przewodów zasilania oraz gniazd zasilania, w zależności od kraju, w jakim będzie ono użytkowane. Informacje i ostrzeżenia WAŻNA INFORMACJA! Urządzenie nie jest całkowicie wodoszczelne. Unikaj zanurzenia, zachlapania oraz wysokiej wilgotności. Narażenie urządzenia na te czynniki może spowodować jego trwałe uszkodzenie. WAŻNA INFORMACJA! OPAKOWANIE WAŻNA INFORMACJA! WYCOFANIE Z EKSPLOATACJI
Reef Factory Sp. z o.o. ul. Bydgoska 94 86-032 Niemcz Polska Strona producenta: http://www.reeffactory.com
RoHS 2011/65/EU, RoHS 2015/863, RED 2014/53/EU.
Pełny tekst deklaracji zgodności UE jest dostępny pod następującym adresem internetowym: https://download.reeffactory.com/instructions/basepump/BasePumpCE.pdf
This device complies with part 15 of the FCC rules. Operation is subject to the following two conditions: (1) This device may not cause harmful interference, and (2) this device must accept any interference received including interference that may cause undesired operation. Any changes or modifications not expressly approved by Reef Factory could void the user’s authority to operate the RF Module and/or the product that incorporates the RF Module. The user is cautioned to maintain a 20 cm (8 inch) spacing from the product to ensure compliance with FCC regulations. This device contains RF Module: Part Number: ESP32-C3-12F FCC ID: 2ATPO-ESP-C3-X |


| English | ||||||||||||||||||||||||||||||||||||||||||
|---|---|---|---|---|---|---|---|---|---|---|---|---|---|---|---|---|---|---|---|---|---|---|---|---|---|---|---|---|---|---|---|---|---|---|---|---|---|---|---|---|---|---|
X. Technical information and warnings.
The device is manufactured with different versions of power cables and power outlets, depending on the country in which it will be used. Information and warnings IMPORTANT INFORMATION! The device is not completely waterproof. Avoid immersion, splashing and high humidity. Exposure of the device to these factors may cause permanent damage. IMPORTANT INFORMATION! PACKAGING IMPORTANT INFORMATION! END OF LIFE
This device contains RF Module: Part Number: ESP32-C3-12F FCC ID: 2ATPO-ESP-C3-X |
| German | ||||||||||||||||||||||||||||||||||||||||||
|---|---|---|---|---|---|---|---|---|---|---|---|---|---|---|---|---|---|---|---|---|---|---|---|---|---|---|---|---|---|---|---|---|---|---|---|---|---|---|---|---|---|---|
X. Technische Informationen und Warnhinweise.
Das Gerät wird je nach Land, in dem es verwendet werden soll, mit verschiedenen Versionen von Netzkabeln und Steckdosen hergestellt. Informationen und Warnhinweise WICHTIGE INFORMATIONEN! Das Gerät ist nicht vollständig wasserdicht. Vermeiden Sie Eintauchen, Spritzwasser und hohe Luftfeuchtigkeit. Die Einwirkung dieser Faktoren kann das Gerät dauerhaft beschädigen. WICHTIGE INFORMATIONEN! VERPACKUNG WICHTIGE INFORMATIONEN! END OF LIFE
Part Number: ESP32-C3-12F FCC ID: 2ATPO-ESP-C3-X |
| Polish |
|---|
XI. Warunki gwarancji. |
| English |
|---|
XI. Warranty Conditions. |
| German |
|---|
XI. Gewährleistungsbedingungen. |
| Include Page | ||||
|---|---|---|---|---|
|